
Rice Paper Sails Cake Tutorial
Just like the Fantasy Rice Paper Flowers, these breath taking Rice Paper Sails are simple, elegant and will bring any cake to life in 3 easy steps!
In this tutorial, I show you how you how to make these gorgeous sails and decorate a cake with these amazing, light and ethereal rice paper decorations
JUMP TO VIDEO
What Are Rice Paper Sails?
To understand what rice paper is, I have given a complete explanation about this great edible cake decorating medium, that you can read about in my Fantasy Rice Paper Flower Tutorial blog.
The Rice Paper Sails are a really easy and inexpensive way to decorate cakes that look super impressive.
In 3 easy steps:
Cut: The rice paper into various shapes. You can keep some of the rice paper sails as full size circles.
Soak: Use a container/plate big enough to soak the rice paper in. Like my rice paper sails, you can choose to add colour to the water before soaking the rice paper.
Dry: The rice paper. If you are like me you don’t have much patience! You can dry the rice paper in the oven on a low setting. If you don’t mind waiting, then air drying is also possible. The length of time that air drying will take, will depend on how warm and dry your environment is.
Note: If using cold water soak rice paper for about 30 seconds to 1 minute. If using warm water, you may need to soak the rice paper for a shorter length of time.
How To Make Rice Paper Sails

You will also need some scrunched up baking paper (parchment paper) for each sail or silicone mats, placed onto baking trays.
I used Sugarflair gel paste colours in SkinTone, and AmeriColor in Deep Pink.
Edible lustre dust (not in picture) Sugarflair Snowflake, for brushing over finished sails.
Cut: Preparing the Rice Paper Sails
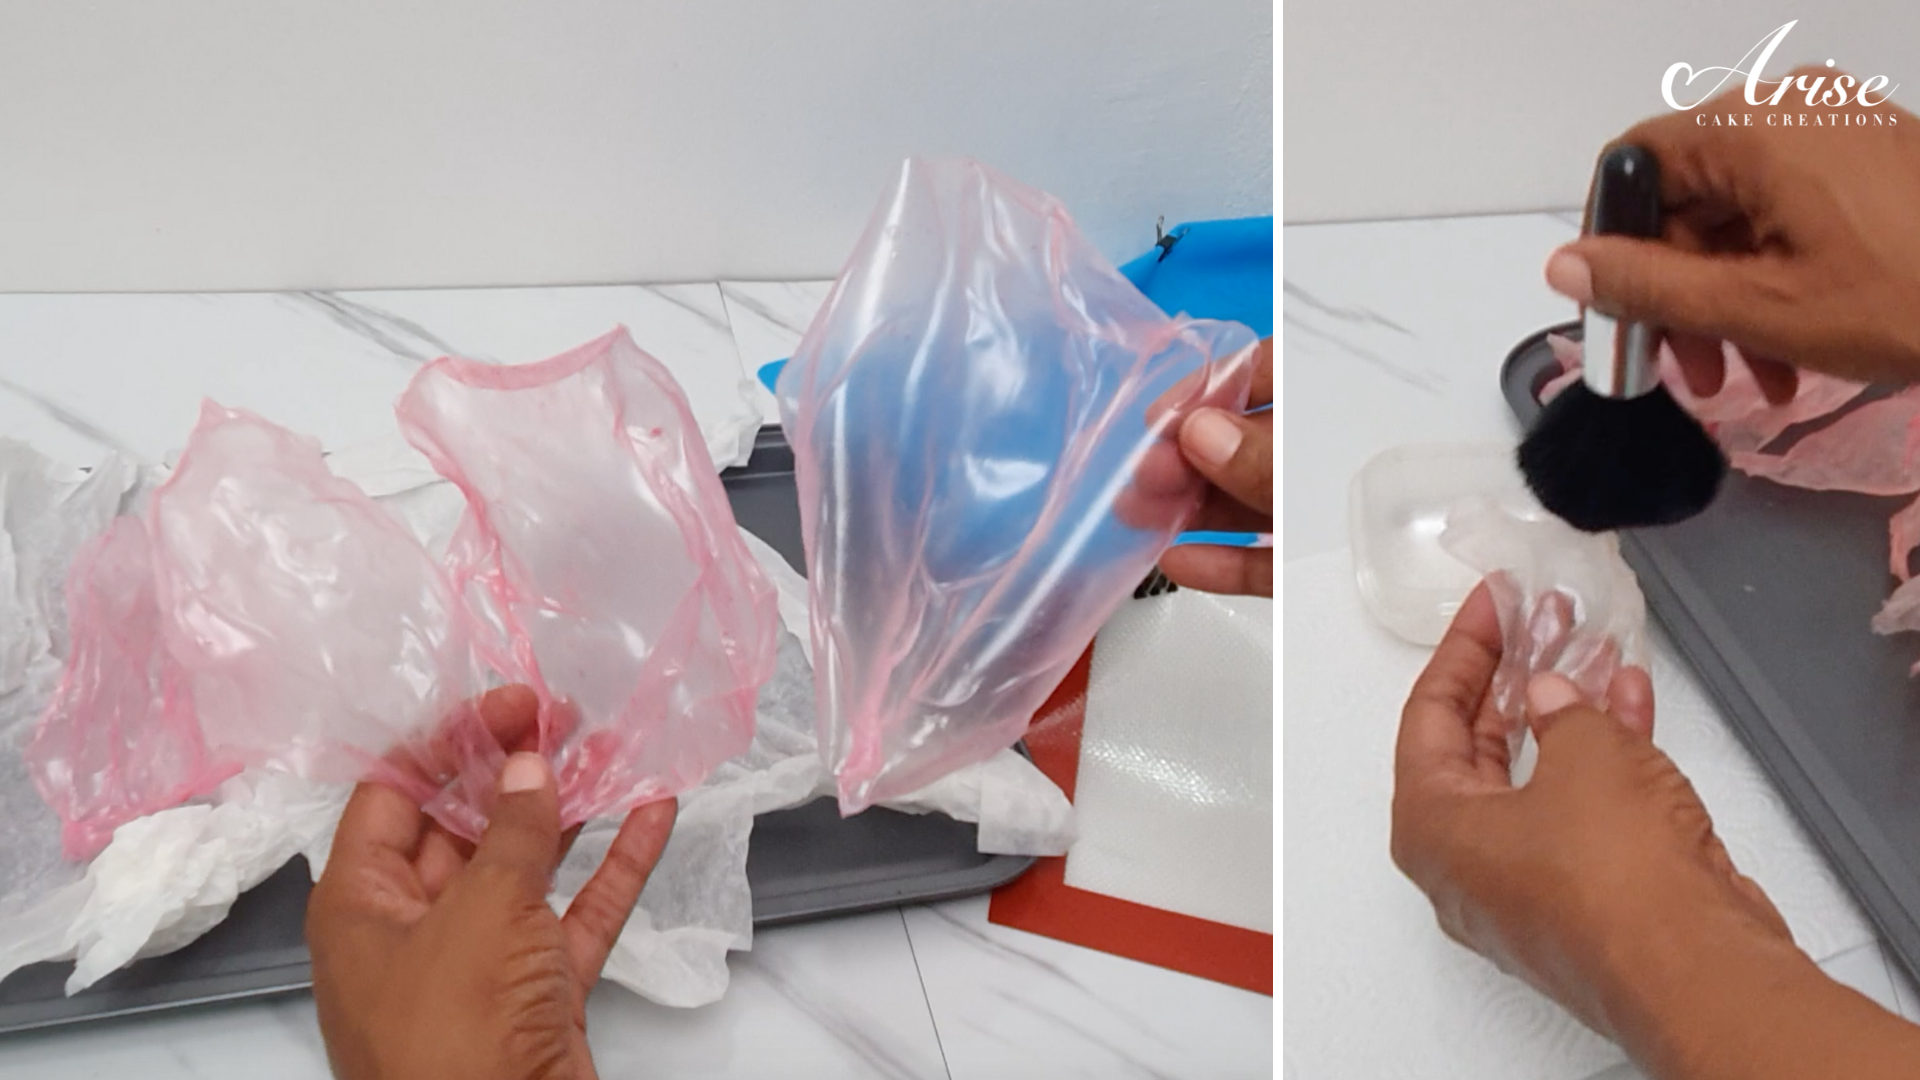
The rice paper is brittle and can snap easily, so handle it with care. If this does happen, no need to panic, it can still be used. The rice paper gets sticky and tacky when wet, enabling you to mend the split by adhering the rice paper back to itself, mending the split.
If you are following my design exactly, cut according to the sizes I have listed. Or cut as desired, into whatever shape you want.
Small Size: 1 disc cut into quarters.
Mid Size: 1 disc cut in half.
Full Size: Keep 2 -3 discs as a full size circle.
Note: My Rice Paper Disc Size is 22cm (8.75 inches)
Ombre Effect: Prepare Your Colours

Add the gel paste colour to a plate or mixing palette. I wanted the sails to follow an ombre effect, leading from very light pink on the front sails, graduating into the darker pink shade in the rice paper flower.
Soak Each Rice Paper Sail
Method 1: Parchment Paper
Scrunch parchment paper into random shapes, ready for the soaked rice paper to rest on.
Pour the water (see my note above regarding the water temperature) into a plate or container big enough to soak the rice paper.
If you are doing the ombre effect, add a small amount of colour each time, before soaking each rice paper. You can also brush on more gel colour if necessary. Work with one rice paper sheet at a time.
Carefully transfer the softened rice paper onto the parchment paper. Allow it to fall into an organic, natural shape.
If you need to attach your sails to your cake in a particular way. When the rice paper gets tacky to the touch, you can add skewers or cocktail sticks to the base of the sails. Just wind the base of the sail around the skewer or cocktail stick and it will just stick to itself.
Method 2: Silicone Mat

You can also use a silicone mat, to make the rice paper sails. The silicone mats are more ridged than parchment paper, but it still create beautiful rice paper sails.
I used 2 different types of silicone mat, a flexible mat and a stiffer mat so you can see the difference. The more flexible the mat used, the more fluid the rice paper shape will be.
Prepare the silicone mat, by moulding it into your desired shape, use clips to hold the shape in place. Or you can place something underneath the mat to give it some dimension.
Prepare and soak your rice paper in exactly the same way as the steps above.
Drape the softened rice paper onto the silicone mat.
Dry The Rice Paper Sails
There are two ways you can dry the rice paper sails. I call it the short way or the long way!
Short Way
The short way is to bake the sails in a preheating low oven set to a temperature of 80C (175F) for 30 minutes. When the baking time has finished, turn off the oven and leave the sails in the oven, with the over door slight ajar for a further 30 minutes to 1 hour or until the sails are completely dry.
Long Way
The long way is to allow the sails to air dry. Depending on how warm and dry your environment is, it could take a couple of hours or over night for the sails to be completely dry.
Comparison: Parchment Paper vs Silicone Mat
The difference between using parchment vs a silicone mat to make the sails. The sails on the parchment paper, have a much more organic fluid shape. The sails on the silicone mat, have a much smoother finish.
You can choose which style of rice paper sail you prefer.
Decorate Your Cake
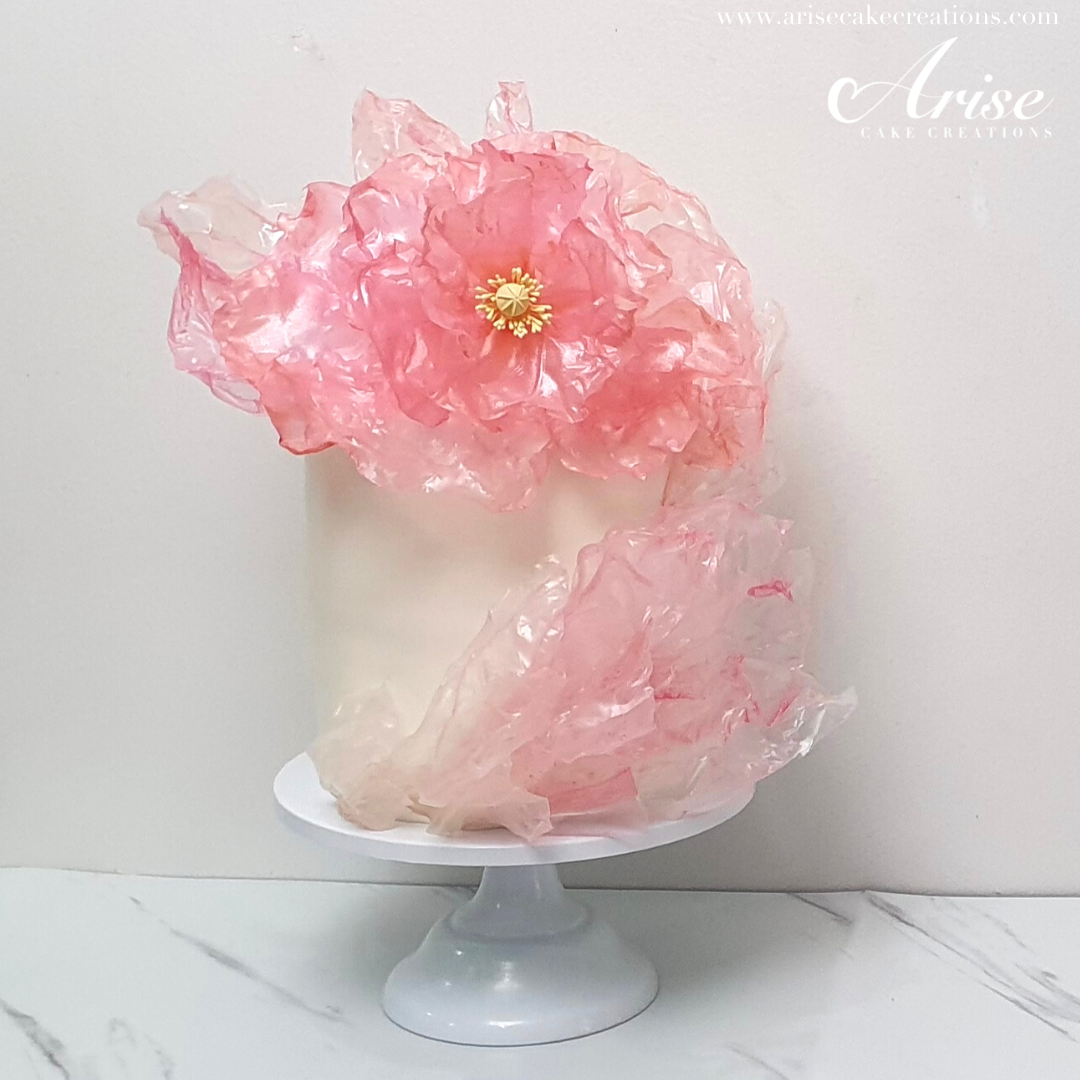
My cake was covered in fondant and was 8 inch diameter, by 8 inch high.
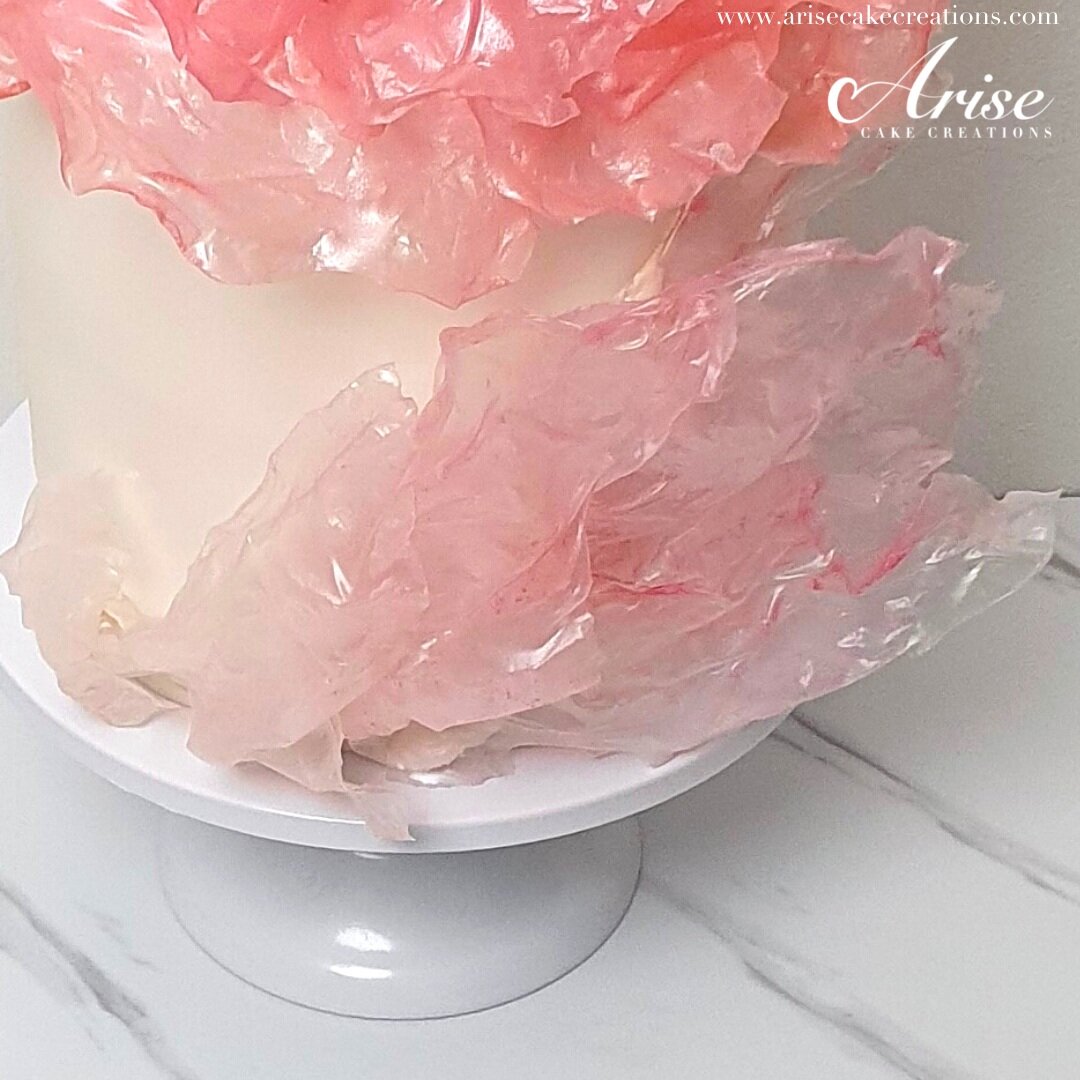
To give the sails some shimmer, I brushed Sugarflair Snowflake lustre dust over each sail (and the Fantasy Rice Paper Flower).
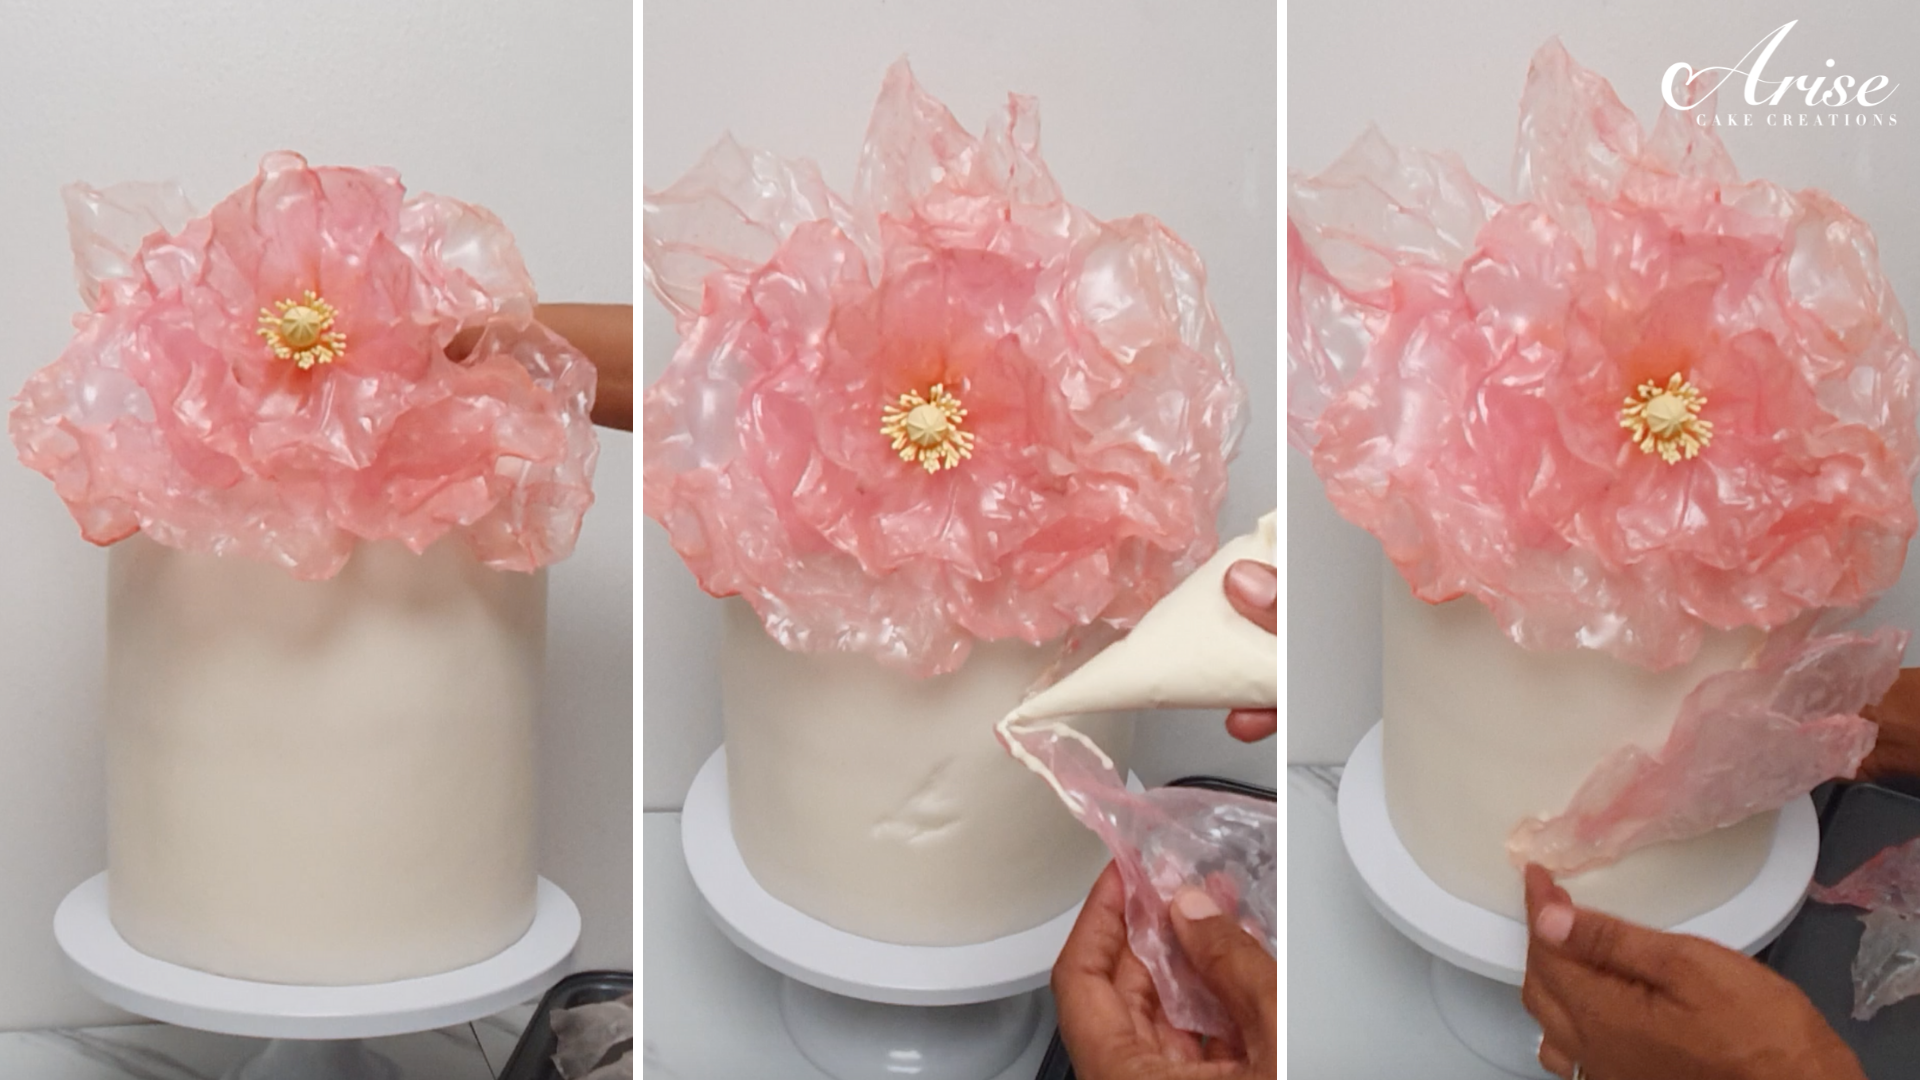
I positioned my Fantasy Rice Paper Flower, into a straw in the top centre of the cake.
I used white chocolate to attach the sails, I started off with the darker pink sails, leading from the flower.
For the front sails, I made an indentation from the base of the sails, then piped white chocolate onto the sails, attached them to the cake by holding they sails in place until the chocolate set. Continue this process from the mid colour to the lightest shade of pink on the front of the cake.
The over finish of the rice paper sails (and rice paper flower) is a beautiful, stunning and dramatic effect, that will look amazing on any cake!
I hope you enjoyed this tutorial. If you make these Rice Paper sails (or Rice Paper Flower), please remember to tag me - #arisecakecreations - @arisecakecreations on Instagram or Facebook, so I can see your beautiful creation.